wubba lubba dub dub.
post @ 2020-05-29

前言

  今天用VS Code 写代码,感觉背景有点单调,所以决定美化一下(美名其曰美化,其实是偷偷摸鱼),网上大部分教程都是使用background插件来自定义vscode的背景图,这种方法需要在配置文件中配置一下,但是折腾完了发现这个方法不是很对我的胃口。

​  这是在使用过程中出现的一些问题:

  1. 在VS Code窗口右下角会有警告提示,虽然可以手动关闭,但是我不喜欢。
  2. 背景图只能覆盖代码区,左侧菜单区是不能覆盖的。
  3. VS Code更新后,配置文件setting.json下修改的适应背景的配置代码会消失。

  感兴趣的小伙伴可以去百度一下教程,我在这里就不在赘述了,这里着重介绍第二种方法:修改一下vscode的源css文件。

**ps:**background插件在删除的时候,会自动删除添加的样式(依赖node环境)。
如果没有node环境,需要在 settings.json 中设置 {“background.enabled”: false} ,然后再删除插件。如果直接删除插件会有遗留,就需要重装vscode了。

这里先把效果图放一下:

如何实现

  1. 进入VS Code的源文件下面,找到 workbench.desktop.main.css 文件,文件地址 E:\Microsoft VS Code\resources\app\out\vs\workbench (我的VS Code安装在E盘下)

    img

  2. 任意的编译器打开workbench.desktop.main.css 文件,可以插入源代码中,也可以直接写在末尾位置,添加body{},这一步也就是在css中写入配置文件,修改添加到背景的图片的相关信息,代码如下:

    body {
    height: 100%;
    width: 100%;
    margin: 0;
    padding: 0;
    overflow: hidden;
    font-size: 11px;
    user-select: none;
    pointer-events: auto;
    background-size: cover; //详见说明
    opacity: 0.75; //透明度修改,注意这里图片和代码文字都能会被透明度影响
    background-position: 0 0;
    background-image: url("file:///F:/picture/wallpaper/cartoon/大姐姐.png");
    content: "";
    position: absolute;
    z-index: 99999;
    width: 100%;
    background-repeat: no-repeat;
    }
阅读此文
post @ 2020-05-19

正文

1. Markdown是什么

Markdown是一种轻量级标记语言,它以纯文本形式(易读、易写、易更改)编写文档,并最终以HTML格式发布。
Markdown也可以理解为将以MARKDOWN语法编写的语言转换成HTML内容的工具。

2. 为什么要使用它?

  • 它是易读(看起来舒服)、易写(语法简单)、易更改纯文本。处处体现着极简主义的影子。
  • 兼容HTML,可以转换为HTML格式发布。
  • 跨平台使用。
  • 越来越多的网站支持Markdown。
  • 更方便清晰地组织你的电子邮件。(Markdown-here, Airmail)
  • 摆脱Word(我不是认真的)。

3. 怎么使用?

如果不算扩展,Markdown的语法绝对简单到让你爱不释手。

Markdown语法主要分为如下几大部分: 标题段落区块引用代码区块强调列表分割线链接图片反斜杠 \符号’`’

3.1 标题

两种形式:
1)使用=-标记一级和二级标题。

阅读此文
post @ 2020-05-12

部分IO库设施:

  • istream:输入流类型,提供输入操作。
  • ostream:输出流类型,提供输出操作。
  • cinistream对象,从标准输入读取数据。
  • coutostream对象,向标准输出写入数据。
  • cerrostream对象,向标准错误写入数据。
  • >>运算符:从istream对象读取输入数据。
  • <<运算符:向ostream对象写入输出数据。
  • getline函数:从istream对象读取一行数据,写入string对象。

IO类(The IO Classes)

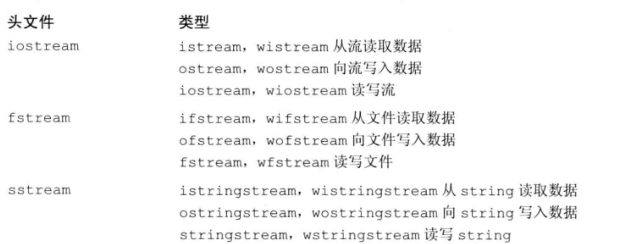
头文件iostream定义了用于读写流的基本类型,fstream定义了读写命名文件的类型,sstream定义了读写内存中string对象的类型。

宽字符版本的IO类型和函数的名字以w开始,如wcinwcoutwcerr分别对应cincoutcerr。它们与其对应的普通char版本都定义在同一个头文件中,如头文件fstream定义了ifstreamwifstream类型。

可以将派生类的对象当作其基类的对象使用。

IO象无拷贝或赋值(No Copy or Assign for IO Objects)

不能拷贝或对IO对象赋值。

ofstream out1, out2;
out1 = out2; // error: cannot assign stream objects
ofstream print(ofstream); // error: can't initialize the ofstream parameter
out2 = print(out2); // error: cannot copy stream objects
阅读此文
post @ 2020-05-02

转载此文章前,请先联系作者,经作者同意后再转载,并请注明原文链接和作者,整理这些不容易,最终版权归作者所有,谢谢合作!

你了解Hexo吗? Hexo是一个静态博客框架,基于Node.js,将Markdown文章通过渲染引擎,生成一个静态网页,再结合Git命令(ssh),Hexo 是一个快速、简洁且高效的博客框架。Hexo 使用 Markdown(或其他渲染引擎)解析文章,在几秒内,即可利用靓丽的主题生成静态网页。

几个月前偶然间了解到了Hexo这个静态博客网站,很适合那些喜欢写作的朋友们,最重要的是它是免费的,里面有许多的博客主题模板,这些主题都是一些很牛的大佬们开发的,而且设计的主题都很棒,让我很心动,心动不如行动,于是开始整理搭建属于自己的博客。直到今天,这中间经历了许多的坎坷荆棘,我将我的博客搭建的流程分享出来,能为那些博客小石榴们提供一些帮助吧,如果有错的话,请给我留言,我会及时修改,废话不多说,直接上教程。

如果下面的教程有错误之处,请在评论区留言,收到后,我会尽快修改,谢谢支持!

一、博客环境搭建

本文系统环境信息:Win10专业版,64位(10.0 版本18362)

Node.js:12.13.0 Git:2.24.0

修改配置文件要用到的软件(可选):

  • Visual Studio Code(适合有开发基础的程序员,非常好用)
  • Sublime Text3,可免费使用。
  • NodePad++ 7.8.1(最新的,也可以在官网选择其他版本)

1.下载Git和Node.js

1.1 Node.js的安装与配置

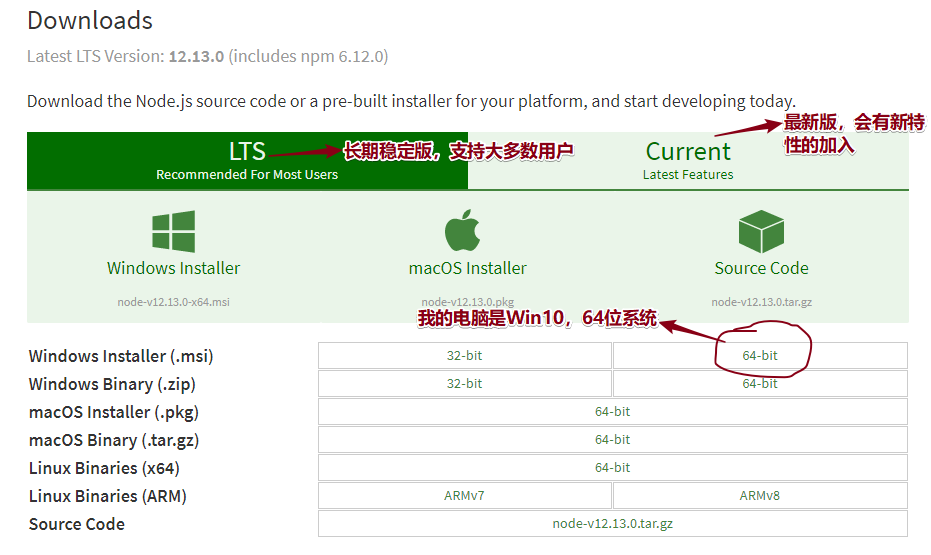
首先去Node.js官网 下载node.js的安装程序,根据你电脑系统的配置信息,下载对应的安装程序,然后开始进行下面的步骤。

Node.js下载以及版本的选择

阅读此文
post @ 2020-04-25

类的基本思想是数据抽象(data abstraction)和封装(encapsulation)。数据抽象是一种依赖于接口(interface)和实现(implementation)分离的编程及设计技术。类的接口包括用户所能执行的操作;类的实现包括类的数据成员、负责接口实现的函数体以及其他私有函数。

定义抽象数据类型(Defining Abstract Data Types)

设计Sales_data类(Designing the Sales_data Class)

类的用户是程序员,而非应用程序的最终使用者。

定义改进的Sales_data类(Defining the Revised Sales_data Class)

成员函数(member function)的声明必须在类的内部,定义则既可以在类的内部也可以在类的外部。定义在类内部的函数是隐式的内联函数。

struct Sales_data
{
// new members: operations on Sales_data objects
std::string isbn() const { return bookNo; }
Sales_data& combine(const Sales_data&);
double avg_price() const;

// data members
std::string bookNo;
unsigned units_sold = 0;
double revenue = 0.0;
};

成员函数通过一个名为this的隐式额外参数来访问调用它的对象。this参数是一个常量指针,被初始化为调用该函数的对象地址。在函数体内可以显式使用this指针。

total.isbn()
// pseudo-code illustration of how a call to a member function is translated
Sales_data::isbn(&total)

std::string isbn() const { return this->bookNo; }
std::string isbn() const { return bookNo; }

默认情况下,this的类型是指向类类型非常量版本的常量指针。this也遵循初始化规则,所以默认不能把this绑定到一个常量对象上,即不能在常量对象上调用普通的成员函数。

阅读此文
post @ 2020-04-15

函数基础(Function Basics)

典型的函数定义包括返回类型(return type)、函数名字、由0个或多个形式参数(parameter,简称形参)组成的列表和函数体(function body)。函数执行的操作在函数体中指明。

// factorial of val is val * (val - 1) * (val - 2) . . . * ((val - (val - 1)) * 1)
int fact(int val)
{
int ret = 1; // local variable to hold the result as we calculate it
while (val > 1)
ret *= val--; // assign ret * val to ret and decrement val
return ret; // return the result
}

程序通过调用运算符(call operator)来执行函数。调用运算符的形式之一是一对圆括号(),作用于一个表达式,该表达式是函数或者指向函数的指针;圆括号内是一个用逗号隔开的实际参数(argument,简称实参)列表,用来初始化函数形参。调用表达式的类型就是函数的返回类型。

int main()
{
int j = fact(5); // j equals 120, i.e., the result of fact(5)
cout << "5! is " << j << endl;
return 0;
}

函数调用完成两项工作:

  • 用实参初始化对应的形参。
  • 将控制权从主调函数转移给被调函数。此时,主调函数(calling function)的执行被暂时中断,被调函数(called function)开始执行。

return语句结束函数的执行过程,完成两项工作:

  • 返回return语句中的值(可能没有值)。
  • 将控制权从被调函数转移回主调函数,函数的返回值用于初始化调用表达式的结果。

实参是形参的初始值,两者的顺序和类型必须一一对应。

阅读此文
post @ 2020-04-11

exercise_5.1

/*
什么是空语句?什么时候会用到空语句?

只含义一个单独的分号的语句是空语句。如: ;

如果在程序的某个地方,语法上需要一条语句但是逻辑上不需要,此时应该使用空语句。
while (cin >> s && s != sought)
;
*/

exercise_5.2

/*
什么是块?什么时候会用到块?

用花括号括起来的语句和声明的序列就是块。
{
// ...
}
如果在程序的某个地方,语法上需要一条语句,而逻辑上需要多条语句,此时应该使用块
while (val <= 10) {
sum += val;
++val;
}
*/

exercise_5.3

/*
使用逗号运算符重写1.4.1节的 while 循环,使它不再需要块,
观察改写之后的代码可读性提高了还是降低了。

while (val <= 10)
sum += val, ++val;.

代码的可读性反而降低了。
*/

exercise_5.4

/*
说明下列例子的含义,如果存在问题,试着修改它。

(a) while (string::iterator iter != s.end()) { . . . }
(b) while (bool status = find(word)) { . . . }
if (!status) { . . . }

(a) 这个循环试图用迭代器遍历string,但是变量的定义应该放在循环的外面,目前每次循环都会重新定义一个变量,明显是错误的。
(b) 这个循环的 while 和 if 是两个独立的语句,if 语句中无法访问 status 变量,正确的做法是应该将 if 语句包含在 while 里面,

*/

exercise_5.5

#include <iostream>
#include <string>
#include <vector>

using namespace std;

int main()
{

for (int score; cin >> score;)
{
vector<string> garden{"F", "D", "C", "B", "A", "A++"};

string lettergrade;
if(score<60)
lettergrade = garden[0];
else{
lettergrade = garden[(score - 50) / 10];
if(score!=100)
lettergrade = score % 10 > 7 ? "+" : score % 10 < 3 ? "-" : "";
cout << lettergrade << endl;
}

}
return 0;
}


阅读此文
post @ 2020-04-10

简单语句(Simple Statements)

如果在程序的某个地方,语法上需要一条语句但是逻辑上不需要,则应该使用空语句(null statement)。空语句中只含有一个单独的分号;

// read until we hit end-of-file or find an input equal to sought
while (cin >> s && s != sought)
; // null statement

使用空语句时应该加上注释,从而令读这段代码的人知道该语句是有意省略的。

多余的空语句并非总是无害的。

// disaster: extra semicolon: loop body is this null statement
while (iter != svec.end()) ; // the while body is the empty statement
++iter; // increment is not part of the loop

复合语句(compound statement)是指用花括号括起来的(可能为空)语句和声明的序列。复合语句也叫做块(block),一个块就是一个作用域。在块中引入的名字只能在块内部以及嵌套在块中的子块里访问。通常,名字在有限的区域内可见,该区域从名字定义处开始,到名字所在(最内层)块的结尾处为止。

语句块不以分号作为结束。

空块的作用等价于空语句。

语句作用域(Statement Scope)

阅读此文
post @ 2020-04-07

Exercise_4.1

//表达式 5 + 10 * 20 / 2 的求值结果是多少?
#include <iostream>
using namespace std;

int main()
{
int t = 5 + 10 * 20 / 2;
cout << "the result is " << t << endl;
return 0;
}

Exercise_4.2

/*
根据4.12节中的表,在下述表达式的合理位置添加括号,
使得添加括号后运算对象的组合顺序与添加括号前一致。
*/

#include <iostream>
#include <vector>
using namespace std;

int main()
{
vector <int> vec(10, 0);
int first1 = *(vec.begin());
int first2 = (*(vec.begin())) + 1;
cout << first1 << " " << first2;
return 0;
}

Exercise_4.3

/*
C++语言没有明确规定大多数二元运算符的求值顺序,给编译器优化留下了余地。
这种策略实际上是在代码生成效率和程序潜在缺陷之间进行了权衡,
你认为这可以接受吗?请说出你的理由。

可以接受。C++的设计思想是尽可能地“相信”程序员,将效率最大化。
然而这种思想却有着潜在的危害,就是无法控制程序员自身引发的错误。
因此 Java 的诞生也是必然,Java的思想就是尽可能地“不相信”程序员。
*/

Exercise_4.4

/*
在下面的表达式中添加括号,说明其求值过程及最终结果。
编写程序编译该(不加括号的)表达式并输出结果验证之前的推断。
*/

#include <iostream>
#include <vector>
using namespace std;

int main()
{
int t= 12 / 3 * 4 + 5 * 15 + 24 % 4 / 2;
int s = ((12 / 3) * 4) + (5 * 15) + ((24 % 4) / 2);
cout << t<<" "<<s<< endl;
return 0;
}

Exercise_4.5

//写出下列表达式的求值结果。
/*
-30 * 3 + 21 / 5 // -90+4 = -86
-30 + 3 * 21 / 5 // -30+63/5 = -30+12 = -18
30 / 3 * 21 % 5 // 10*21%5 = 210%5 = 0
-30 / 3 * 21 % 4 // -10*21%4 = -210%4 = -2
*/
阅读此文
post @ 2020-04-07

第4章 表达式

基础(Fundamentals)

表达式(expression)由一个或多个运算对象(operand)组成,对表达式求值将得到一个结果(result)。字面值和变量是最简单的表达式,其结果就是字面值和变量的值。

基础概念(Basic Concepts)

C++定义了一元运算符(unary operator)和二元运算符(binary operator)。除此之外,还有一个作用于三个运算对象的三元运算符。函数调用也是一种特殊的运算符,它对运算对象的数量没有限制。

表达式求值过程中,小整数类型(如boolcharshort等)通常会被提升(promoted)为较大的整数类型,主要是int

C++定义了运算符作用于内置类型和复合类型的运算对象时所执行的操作。当运算符作用于类类型的运算对象时,用户可以自定义其含义,这被称作运算符重载(overloaded operator)。

C++的表达式分为右值(rvalue)和左值(lvalue)。当一个对象被用作右值的时候,用的是对象的值(内容);当对象被用作左值时,用的是对象的地址。需要右值的地方可以用左值代替,反之则不行。

  • 赋值运算符需要一个非常量左值作为其左侧运算对象,返回结果也是一个左值。
  • 取地址符作用于左值运算对象,返回指向该运算对象的指针,该指针是一个右值。
  • 内置解引用运算符、下标运算符、迭代器解引用运算符、stringvector的下标运算符都返回左值。
  • 内置类型和迭代器的递增递减运算符作用于左值运算对象。前置版本返回左值,后置版本返回右值。

如果decltype作用于一个求值结果是左值的表达式,会得到引用类型。

阅读此文
post @ 2020-04-04

虽然可以使用 cin 和 >> 运算符来输入字符串,但它可能会导致一些需要注意的问题。

当 cin 读取数据时,它会传递并忽略任何前导白色空格字符(空格、制表符或换行符)。一旦它接触到第一个非空格字符即开始阅读,当它读取到下一个空白字符时,它将停止读取。以下面的语句为例:

cin >> namel;

可以输入 “Mark” 或 “Twain”,但不能输入 “Mark Twain”,因为 cin 不能输入包含嵌入空格的字符串。下面程序演示了这个问题:

// This program illustrates a problem that can occur if
// cin is used to read character data into a string object.
#include <iostream>
#include <string> // Header file needed to use string objects
using namespace std;

int main()
{
string name;
string city;
cout << "Please enter your name: ";
cin >> name;
cout << "Enter the city you live in: ";
cin >> city;
cout << "Hello, " << name << endl;
cout << "You live in " << city << endl;
return 0;
}

程序输出结果:

Please enter your name: John Doe
Enter the city you live in: Hello, John
You live in Doe

请注意,在这个示例中,用户根本没有机会输入 city 城市名。因为在第一个输入语句中,当 cin 读取到 John 和 Doe 之间的空格时,它就会停止阅读,只存储 John 作为 name 的值。在第二个输入语句中, cin 使用键盘缓冲区中找到的剩余字符,并存储 Doe 作为 city 的值。

为了解决这个问题,可以使用一个叫做 getline 的 C++ 函数。此函数可读取整行,包括前导和嵌入的空格,并将其存储在字符串对象中。

getline 函数如下所示:

阅读此文
post @ 2020-04-04

Exercise 3.2

/*
* 编写一段程序从标准输入中一次读入一行,然后修改该程序使其一次读入一个词。
*/

#include <iostream>
#include <string>

using std::string;
using std::cin;
using std::cout;
using std::endl;

int main()
{
string s;
while (getline(cin,s))
{
cout << s << endl;
} //一次读入一行

while (cin >> s)
{
cout << s << endl;
} //一次读入一个词

return 0;
}

Exercise 3.3

/*
* 请说明string类的输入运算符和getline函数分别是如何处理空白字符的。
*/

#include <iostream>
#include <string>

using std::string;
using std::cin;
using std::cout;
using std::endl;

int main()
{
/*******输入 " this is a string."************/
/*
* 类似 getline(is, s) 的读取,string对象
* 会从输入流中读取字符,直到遇见换行符为止。
*/
string s; // 输入 " this is a string."
while (getline(cin,s))
{
cout << s << endl;
}
/*
* 类似 is >> s 的读取,string对象会忽略开头的空白
* 并从第一个真正的字符开始,直到遇见下一空白为止。
*/
while (cin >> s)
{
cout << s << endl;
}

return 0;
}

Exercise 3.4

/*
* 请说明string类的输入运算符和getline函数分别是如何处理空白字符的。
*/

#include <iostream>
#include <string>

using std::string;
using std::cin;
using std::cout;
using std::endl;

int main()
{
/*******输入 " this is a string."************/
/*
* 类似 getline(is, s) 的读取,string对象
* 会从输入流中读取字符,直到遇见换行符为止。
*/
string s; // 输入 " this is a string."
while (getline(cin,s))
{
cout << s << endl;
}
/*
* 类似 is >> s 的读取,string对象会忽略开头的空白
* 并从第一个真正的字符开始,直到遇见下一空白为止。
*/
while (cin >> s)
{
cout << s << endl;
}

return 0;
}

Exercise 3.5

/*
* 编写一段程序从标准输入中读入多个字符串并将他们连接起来,
* 输出连接成的大字符串。然后修改上述程序,用空格把输入的多个字符串分割开来。
*/

#include <iostream>
#include <string>

using std::string;
using std::cin;
using std::cout;
using std::endl;

int main()
{
string result, s;
while (cin >> s)
{
result += s;
}
cout << result << endl;

string result, s;
while (cin >> s)
{
result += s + " ";
}
cout << result << endl;

return 0;
}

Exercise 3.6

#include <iostream>
#include <string>

using std::string;
using std::cin;
using std::cout;
using std::endl;

int main()
{
string line ("this is a string.");
for(auto &c:line){
if(isalpha(c)){
c = 'X';
}
}
cout << line << endl;
return 0;
}
阅读此文

命名空间的using声明(Namespace using Declarations)

使用using声明后就无须再通过专门的前缀去获取所需的名字了。

using std::cout;

程序中使用的每个名字都需要用独立的using声明引入。

头文件中通常不应该包含using声明。

标准库类型string(Library string Type)

标准库类型string表示可变长的字符序列,定义在头文件string中。

定义和初始化string对象(Defining and Initializing strings)

初始化string的方式:

3-1

阅读此文
post @ 2020-03-17

一切皆socket

socket起源于UNIX,可以看出来socket完美的贴合了UNIX一切皆文件的编程思想.我们可以对socket描述符进行ORW的操作,类似普通文件.

在网络编程中,都是由socket实现的,在linux中,socket由上层的libc中的socket和内核中的socket两部分组成,当然为了和硬件交互,最后还需要控制网卡驱动,才是一个完整的体系.

这里我们可以进行一个完整流程的追踪,直接断在tcp_emu上.然后查看调用栈,回溯一下

#0  tcp_emu (so=0x7fffe0193ed0, m=0x7fffe0180e20) at /home/mozhucy/qemu-3.0.0/slirp/tcp_subr.c:617
#1 0x0000555555bfc697 in tcp_input (m=0x7fffe0180e20, iphlen=20, inso=0x0, af=2) at /home/mozhucy/qemu-3.0.0/slirp/tcp_input.c:572
#2 0x0000555555bf35c7 in ip_input (m=0x7fffe0180e20) at /home/mozhucy/qemu-3.0.0/slirp/ip_input.c:206
#3 0x0000555555bf6a4a in slirp_input (slirp=0x55555680c500, pkt=0x7fffe02f2700 "RU\n", pkt_len=1334) at /home/mozhucy/qemu-3.0.0/slirp/slirp.c:874
#4 0x0000555555bdf408 in net_slirp_receive (nc=0x55555680c350, buf=0x7fffe02f2700 "RU\n", size=1334) at /home/mozhucy/qemu-3.0.0/net/slirp.c:121
#5 0x0000555555bd5117 in nc_sendv_compat (nc=0x55555680c350, iov=0x7fffeedc3310, iovcnt=1, flags=0) at /home/mozhucy/qemu-3.0.0/net/net.c:701
#6 0x0000555555bd51d9 in qemu_deliver_packet_iov (sender=0x5555578b7d90, flags=0, iov=0x7fffeedc3310, iovcnt=1, opaque=0x55555680c350) at /home/mozhucy/qemu-3.0.0/net/net.c:728
#7 0x0000555555bd7b08 in qemu_net_queue_deliver (queue=0x55555680c290, sender=0x5555578b7d90, flags=0, data=0x7fffe02f2700 "RU\n", size=1334) at /home/mozhucy/qemu-3.0.0/net/queue.c:164
#8 0x0000555555bd7c24 in qemu_net_queue_send (queue=0x55555680c290, sender=0x5555578b7d90, flags=0, data=0x7fffe02f2700 "RU\n", size=1334, sent_cb=0x0) at /home/mozhucy/qemu-3.0.0/net/queue.c:199
#9 0x0000555555bd4f7e in qemu_send_packet_async_with_flags (sender=0x5555578b7d90, flags=0, buf=0x7fffe02f2700 "RU\n", size=1334, sent_cb=0x0) at /home/mozhucy/qemu-3.0.0/net/net.c:655
#10 0x0000555555bd4fb6 in qemu_send_packet_async (sender=0x5555578b7d90, buf=0x7fffe02f2700 "RU\n", size=1334, sent_cb=0x0) at /home/mozhucy/qemu-3.0.0/net/net.c:662
#11 0x0000555555bd4fe3 in qemu_send_packet (nc=0x5555578b7d90, buf=0x7fffe02f2700 "RU\n", size=1334) at /home/mozhucy/qemu-3.0.0/net/net.c:668
#12 0x0000555555aeb758 in rtl8139_transfer_frame (s=0x5555578b2d30, buf=0x7fffe02f2700 "RU\n", size=1334, do_interrupt=1, dot1q_buf=0x0) at /home/mozhucy/qemu-3.0.0/hw/net/rtl8139.c:1804
#13 0x0000555555aecb73 in rtl8139_cplus_transmit_one (s=0x5555578b2d30) at /home/mozhucy/qemu-3.0.0/hw/net/rtl8139.c:2332
#14 0x0000555555aecc31 in rtl8139_cplus_transmit (s=0x5555578b2d30) at /home/mozhucy/qemu-3.0.0/hw/net/rtl8139.c:2359
#15 0x0000555555aed8a2 in rtl8139_io_writeb (opaque=0x5555578b2d30, addr=217 '\331', val=64) at /home/mozhucy/qemu-3.0.0/hw/net/rtl8139.c:2742
#16 0x0000555555aee87f in rtl8139_ioport_write (opaque=0x5555578b2d30, addr=217, val=64, size=1) at /home/mozhucy/qemu-3.0.0/hw/net/rtl8139.c:3279
#17 0x000055555585cbb6 in memory_region_write_accessor (mr=0x5555578b57c0, addr=217, value=0x7fffeedc37e8, size=1, shift=0, mask=255, attrs=...) at /home/mozhucy/qemu-3.0.0/memory.c:527
#18 0x000055555585cdce in access_with_adjusted_size (addr=217, value=0x7fffeedc37e8, size=1, access_size_min=1, access_size_max=4, access_fn=0x55555585cacc <memory_region_write_accessor>, mr=0x5555578b57c0, attrs=...) at /home/mozhucy/qemu-3.0.0/memory.c:594
#19 0x000055555585f9f6 in memory_region_dispatch_write (mr=0x5555578b57c0, addr=217, data=64, size=1, attrs=...) at /home/mozhucy/qemu-3.0.0/memory.c:1473
#20 0x00005555557fba28 in flatview_write_continue (fv=0x7fffe017c000, addr=4273803481, attrs=..., buf=0x7ffff7ff0028 "@\020", len=1, addr1=217, l=1, mr=0x5555578b57c0) at /home/mozhucy/qemu-3.0.0/exec.c:3255
#21 0x00005555557fbb72 in flatview_write (fv=0x7fffe017c000, addr=4273803481, attrs=..., buf=0x7ffff7ff0028 "@\020", len=1) at /home/mozhucy/qemu-3.0.0/exec.c:3294
#22 0x00005555557fbe78 in address_space_write (as=0x5555566e6640 <address_space_memory>, addr=4273803481, attrs=..., buf=0x7ffff7ff0028 "@\020", len=1) at /home/mozhucy/qemu-3.0.0/exec.c:3384
#23 0x00005555557fbec9 in address_space_rw (as=0x5555566e6640 <address_space_memory>, addr=4273803481, attrs=..., buf=0x7ffff7ff0028 "@\020", len=1, is_write=true) at /home/mozhucy/qemu-3.0.0/exec.c:3395
#24 0x000055555587ac06 in kvm_cpu_exec (cpu=0x555556833070) at /home/mozhucy/qemu-3.0.0/accel/kvm/kvm-all.c:1979
#25 0x0000555555841f35 in qemu_kvm_cpu_thread_fn (arg=0x555556833070) at /home/mozhucy/qemu-3.0.0/cpus.c:1215
#26 0x0000555555d668d7 in qemu_thread_start (args=0x555556854b30) at /home/mozhucy/qemu-3.0.0/util/qemu-thread-posix.c:504
#27 0x00007ffff62526ba in start_thread (arg=0x7fffeedc4700) at pthread_create.c:333
#28 0x00007ffff5f8841d in clone () at ../sysdeps/unix/sysv/linux/x86_64/clone.S:109

可以看到还是很多的调用流程,不过大概可以梳理出一个流程,28-24属于kvm/多CPU初始化的过程,23-17属于内存的处理过程,16-12属于网卡虚拟化内部的数据流处理流程,11-0属于qemu对于数据包的底层调用,也就是qemu网络的后端实现

There are two parts to networking within QEMU:

  • the virtual network device that is provided to the guest (e.g. a PCI network card).
  • the network backend that interacts with the emulated NIC (e.g. puts packets onto the host’s network).

slirp_input函数作为入口

static ssize_t net_slirp_receive(NetClientState *nc, const uint8_t *buf, size_t size)
{
SlirpState *s = DO_UPCAST(SlirpState, nc, nc);

slirp_input(s->slirp, buf, size);

return size;
}
阅读此文
⬆︎TOP